Comfortable development on your probably notebook shaped ARM computer
Written by Tamás Deme on Tue Mar 11 2025.
While there are some ARM based Windows desktop PCs out there, they are significantly harder to acquire than their notebook and tablet shaped counterparts. Which means if you'd like to develop on and for your fancy new Snapdragon X Elite chip... statistically you're probably doing that on something that was intended for portable use. Now I don't know about anyone else, but I, personally absolutely loathe working on anything portable, and would very much like to use my comfortable desktop PC, full sized keyboard, mouse and 3 monitors: follow this short guide and I'll show you how!
The Basics #
First, we need to get your basic development environment up. I don't want to detail this too much - you're probably very familiar with these steps. The only new and exciting part is that Visual Studio is available as a native Arm64 application since version 17.4, therefore you no longer need to rely on emulation for most developer workloads. While on the downloads page you should get the proper Arm64 installer automagically. Don't forget to select the latest WinAppSdk and .NET bits during the setup process!
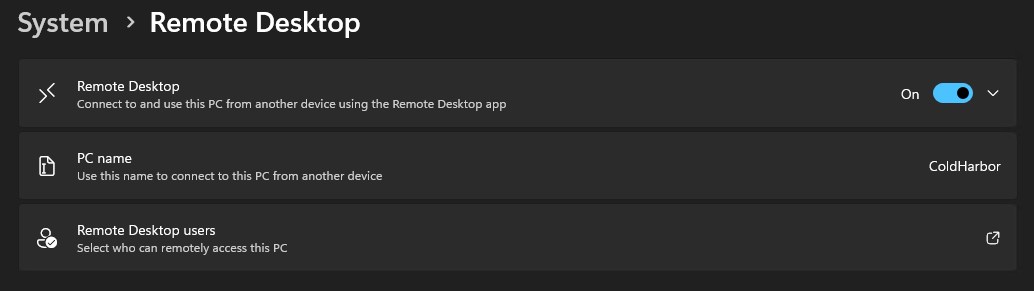
After that's done, head to the Settings app, System category and enable developer mode in the "For developers" area (not forgetting to toggle the many dev-friendly settings along the way), and then enable remote desktop:
After this is done, back on our comfy desktop PC, we're ready to go:
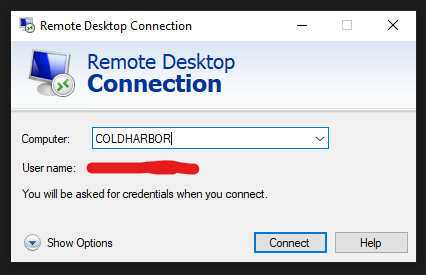
Entering your new PC's name and using the same MSA should let you right in!
The Troubles #
Aaaand we're done, you're ready to work "remotely"! Except we're not, since you probably got an error while attempting to log in. (The headline above probably gave this away.)
This is because most of you probably have MFA enabled, and when you signed into your computer with your trusty MSA, not a single time you have actually typed your password. This also means, that Windows has no idea what your MSA password is, and when you remotely try to authenticate against it, you'll fail. To fix this, we need to force Windows to cache your MSA creds... and the easiest way to do this is via the runas command, except we'll just run the command as yourself - as this handy StackExchange answer describes. Pick any application to launch - as long as it's easy to verify it actually launched, e.g. calc, mspaint or notepad are true classics: runas /u:MicrosoftAccount\marks.lumon@outlook.com calc - don't forget to replace the example MSA with your actual one!
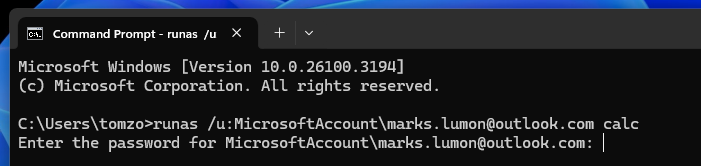
(In case you have removed your MSA password completely, the handy StackExchange link above is still useful, just scroll up to the first answer and start with a local account that you'll re-link with your MSA after.)
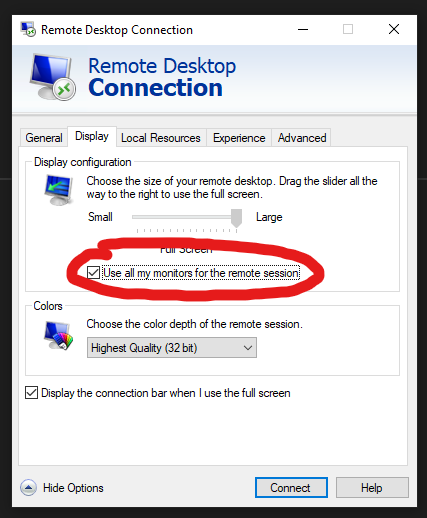
For a final touch, expand the options tab below the login area, go to the "Display" tab and enable "Use all my monitors for the remote session" to enjoy the remote machine as if it'd truly be your desktop:
shore party out